Albert Palomas

Electronics & Life Lover

Common bitwise operations in c/c++

This is a resume of most common bitwise operations in c/c++. Always useful to have in hand! Extracted from here: https://stackoverflow.com/questions/47981/how-do-you-set-clear-and-toggle-a-single-bit

Setting a bit

number |= 1 << n;

Clearing a bit

number &= ~(1 << n);

Toggling a bit

number ^= 1 << n;

Checking a bit

bit = (number >> n) & 1;

Changing the nth bit to x

number = (number & ~(1 << n)) | (x << n);

Check file signature using windows built-in tool

Usually when you download a executable file from internet you want to verify its signature (MDx or SHx) to make sure it is the authentic file and not a hacked version.

Windows has a already built-in tool called CertUtil and you can call it from cmd:

CertUtil -hashfile <path to file> MD5

It will give back the MD5 checksum, but you can also check for any SHAx or MDx

LoRa – MySQL link using two Hope RFM69W and a Raspberry Pi

After looking for a already implemented solution for getting data from remote sensors, I decided to build my own solution, using existing components like Arduino, Raspberry Pi and especially I was interested on using the low cost RFM69W LoRa module.

My other target was to send the data to my own MySQL server instead of using third-party parterns like TTN.

And how it works? Basically it consist of two parts: sensors and gateway.

Sensor

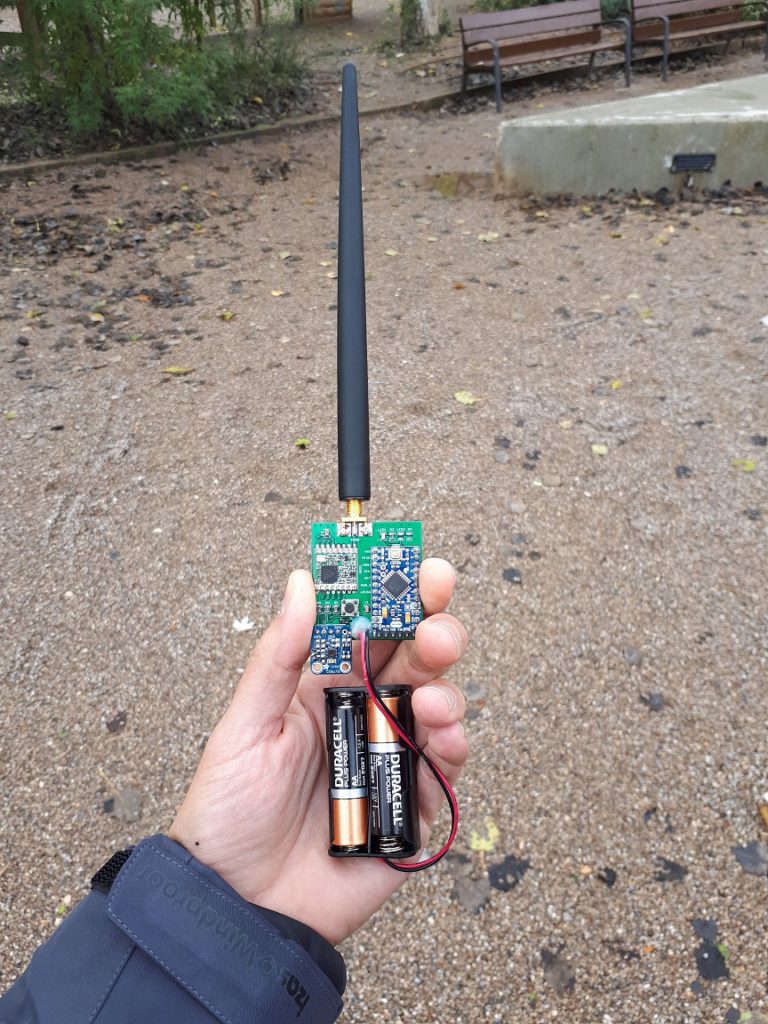
It uses an Arduino Mini Pro 3.3V – 8MHz version as a processing core. It remains on deep-sleep mode, consuming less than 5 micro amperes and it wakes up every 10 minutes, sends data during few seconds, and sleep again. This strategy allows the sensor to be powered from 2 standard AA batteries and having an autonomy longer than a year.

Sensor powered from 2 AA batteries

The RFM69W module is connected to the Arduino using SPI and few control signals:

Arduino Mini PROLoRa RFM69W module
10 – SLAVE SELECTNNS
11 – MOSIMOSI
12 – MISOMISO
13 – SCKSCK
A0 – RESETRESET
2 – DIO0DIO0
7 – DIO1 (not used)DIO1
8 – DIO2 (not used)DIO2

It also contains a Adafruit Si7020 temerature & humidity sensor, connected via I2C to the Arduino (I removes and bridged transistors of this module to work at 3.3V)

Gateway

The gateway is mostly a Rasperry Pi connected to a RFM69 module using SPI and control signals This is the pinout:

Raspberry Pi (BCM numeration)LoRa RFM69 module
9 – MISOMISO
10 – MOSIMOSI
11 – SCKSCK
8NSS
25DIO0
22RESET
23EXTERNAL LED (not in module)

TODO: Write about software and firmware

idf.py build: too few arguments issue

Ok, if you got here, probably you got the same issue. After few hours trying to solve it, i finally found the solution.

The reason of this issue in my case is that I got a previous installation of python (platform.io has it’s own installer and I installed it before installing official esp-idf sdk).

The solution is to edit a pair of register keys, which are set from previous version of python and not updated by the new installation of python 2.7.14 in my case.

These are the keys you should edit (remember to make a backup before editing registers):

“HKEY_CLASSES_ROOT\Applications\python.exe\shell\open\command” and “HKEY_CLASSES_ROOT\Python.Files\shell\open\command ” Both sould have this same value: “C:\Python27\python.exe” “%1” %*

I hope you find it useful!


Paralleling power MOSFET considerations

mosfets in parallel

Are you thinking on paralleling power MOSFETs on your design to increase power output?
One much publicized benefit of power MOSFETs (compared to other semiconductor devices) is that it is easy to parallel them to create a group with increased capability.
Although this feature is superficially true, there are several potential problems that you should consider.
I recommend you to read these application notes from different manufacturers:

Good luck!


Burn prebuilt HEX or ELF file using MPLAB X

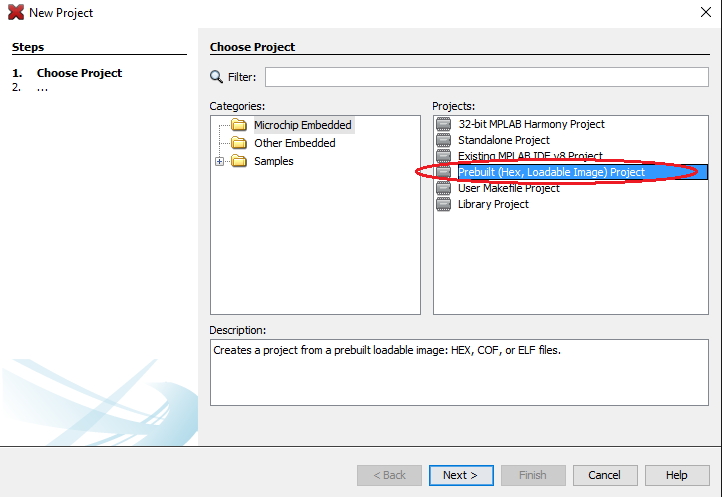
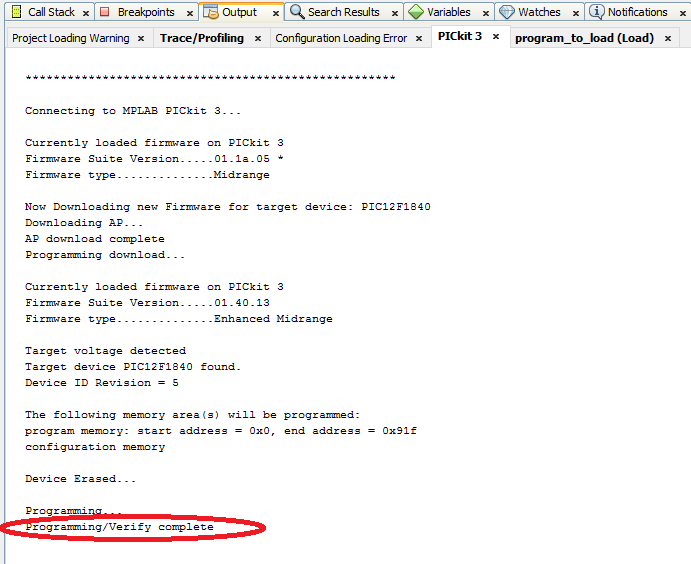
These are the simple but maybe unknown steps for burning a HEX file into a PIC microcontroller using MPLAB X IDE:

Select prebuilt project

Select prebuilt project

Select file and device

Select file and device

Write a project name

Write a project name

Make and load

Make and load

Ensure loading has succeeded

Ensure loading has succeeded

Scratch 4 Arduino with Adafruit Motor Shield v2

S4A is a powerful platform to learn programming Arduino but by default it can’t be interfaced with Adafruit Motor Shield. I have rewritten S4A firmware in order to achieve this goal.

You can download firmware from here.

I have tested it on Arduino UNO and this shield.

https://www.adafruit.com/products/1438

This is the relationship with S4A variables and Adafruit Motor Shield outputs:

S4A Adafruit Motor Shield
Analog 5 Speed DC Motor 1
Analog 6 Speed DC Motor 2
Digital 10 Direction DC Motor 1 (HIGH = FRONT) (LOW = BACKWARD)
Digital 11 Direction DC Motor 2 (HIGH = FRONT) (LOW = BACKWARD)
Digital 7 PWM Servomotor 1
Digital 8 PWM Servomotor 2


For compiling this firmware you will need Adafruit Motor Shield Library. It can be downloaded from Adafruit website:

https://learn.adafruit.com/adafruit-motor-shield-v2-for-arduino/install-software

Programari lliure per a la fabricació substractiva

La intenció d’aquest post és fer una mica de resum de la meva experiència en programari lliure per fer servir amb eines i màquines de fabricació substractiva com freses i torns CNC, gravadores làser, plotters de dibuix i del tall… etc.

Programari de disseny (CAD):

Inkscape: Programa de disseny vectorial en 2D molt complert. Seria l’equivalent al Adobe Illustrator en el món Open Source. Pot exportar a DXF, SVG, EPS, HPGL i altres. Al ser un programa de disseny 2D es poden fer dissenys per fabricacions en 2D com: gravats làser, gravats amb fresa, plotters de marcatge, plotters de tall… El format més utilitzat per fer dibuixos en 2D és el DXF. Casi tots els programes CAM l’accepten. Cal tenir en compte que a vegades és necessari fer servir la opció Trayecto -> Objeto a Trayecto.

Gimp: Programa de dissey en 2D amb píxels molt complert. Seria l’equivalent al Adobe Photoshop. Pot exportar a JPG, PNG i altres. Una de les aplicacions per a la fabricació substractiva d’aquest programa és la generació de mapes de bits en escala de colors o B/N per fer fresats amb relleu. També hi ha programes CAM que detecten les línies de contorn per generar trajectòries de eina.

FreeCAD: Programa per al disseny de sòlids en 3D. Pot exportar a STL.

Google Sketchup + pluguin per exportar a STL:  Programa per al disseny de cossos en 3D. Programa que va començar sent de Google i ara és de Trimble. Molt intuïtiu per fer dissenys simples. Es necessita un pluguin per poder exportar a STL.

Programari per generar les trajectòries de la eina (CAM):

CamBam: Permet generar formes simples o importar models en 2D i generar les operacions de: Gravat, Pocketing, Perfil. Actualment la versió lliure no permet treballar amb models 3D però la versió de pagament (molt barata en comparació amb altres softwares CAM) permet importar models 3D i generar les trajectòries de fresat en 3D. Permet generar el GCODE amb el postprocessador seleccionat. Les eines i el postprocessador es poden triar desde la pestanya “System”.

Programari de simulació:

CAMOtics: Permet obrir un fitxer G-Code i dibuixar-ne la trajectòria tenint en compte el gruix de la eina. Es pot exportar el model simulat en STL.

GrblGRU: Simulació de la màquina sencera.

Programari de comunicació amb la màquina (Grbl)

Grbl és un intèrpret de comandes GCode que normalment s’instal·la sobre un Arduino i aquest controla la màquina amb motors PAP o Servomotors. Aquests programes es comuniquen amb el Arduino per port sèrie sobre USB. Tots són similars però amb petites diferències que en funció de la nostra màquina i els treballs que volguem fer, en podem fer servir un o un altre. En general, en tots es pot controlar la màquina manualment i es pot enviar un fitxer G-Code.

Universal G Code Sender

GCode Teleporter

Grbl Controller

GCodeSender

Running Arduino on ATmega1284 from scratch

Today we have been using Arduino IDE on ATmega1284. It is not difficult to get it running but is a little tricky if you don’t know what you are exactly doing. In this post I will show you how to get it working from scratch, using always open hardware & software. This post is written in catalan. Sorry! You can always use google translator 😉

1 – Instalar el plug-in per treballar amb aquest micro en Arduino.

En aquest link hi ha tots els arxius necessaris per l’entorn Arduino:

https://github.com/JChristensen/mighty-1284p/tree/v1.6.3

Com instalar aquests arxius:

  1. Go to https://github.com/JChristensen/mighty-1284p/tree/v1.6.3, click the Download ZIP button and save the ZIP file to a convenient location on your computer.
  2. Ensure that the Arduino IDE is not running.
  3. Go to your Arduino hardware folder.
  4. Unzip the downloaded file into the hardware folder.
  5. The download from GitHub will have a dash and branch name appended, so the folder will be named, e.g. mighty-1284p-v1.6.3. Rename the folder to just mighty-1284p.
  6. The following folders and files should now exist:
    • hardware\mighty-1284p\avr\bootloaders
    • hardware\mighty-1284p\avr\libraries
    • hardware\mighty-1284p\avr\patched-3rd-party-libs
    • hardware\mighty-1284p\avr\variants
    • hardware\mighty-1284p\avr\boards.txt
    • hardware\mighty-1284p\avr\boards.txt.alt
    • hardware\mighty-1284p.gitignore
    • hardware\mighty-1284p\README.md
  7. Move any mighty-1284p compatible 3rd party patched libs under [sketchfolder]\libraries as required. (Note: the mighty-1284p compatible “official” patched libs are already set-up to be used as default when using mighty-1284p by being in avr\libraries. If the wrong libs are being used, check to see that there aren’t old versions of the patched libs still under [sketchfolder]\libraries, as those would take precedence.)
  8. Restart the Arduino IDE.
  9. Select the desired board from the Tools > Board menu and enjoy those extra pins and all that extra memory!

Note: There is an alternative version of the boards.txt file supplied named boards.txt.alt. It provides more combinations of boards and clock speeds than the standard boards.txt selection menu. It uses a two-step selection of board type and then clock-speed via a submenu. As this differs from the standard boards.txt format, it is provided as an option for those users with more specialized needs, while the default boards.txt retains the more familiar style of interface, to minimise any potential for confusion.

To enable the alternate version, rename boards.txt to boards.txt.org, and then rename boards.txt.alt to boards.txt. Restart IDE, and the new selection options will appear.


2 – Carregar el bootloader al ATmega1284:

Ens hem fet un programador amb un Arduino MEGA 2560. El firmware del programador esta al mateix entorn del Arduino, a Exemples > ArduinoISP. Hem grabat el firmware al programador i OK. Ara tenim la placa d’arduino que ens fa de programador.

Hem connectat les potes del arduino mega al micro 1284 de la següent manera:


El connector on hi posa arduino esta pensat per conectar-ho a un arduino UNO. Com que nosaltres ho hem fet amb un Mega, els pins canvien per aquests:


ATmega1284 Arduino mega 2560
RESET, pin 9 53
MOSI, pin 6 51
MISO, pin 7 50
SCK, pin 8 52


Per carregar el bootloader hem de seleccionar la placa que volguem de les disponibles. Nosaltres hem fet servir la “maniacbug” perquè té un pinout més intuitiu.

Un cop seleccionada la placa cal seleccionar el programador que volem a Tools > Programmer. En aquest cas li hem dit Arduino as ISP.

Ara ja podem baixar el bootloader fent: Burn Bootloader al menú Tools.


Nota:  Ens hem trobat amb el problema que l’identificador del micro no era l’esperat. La placa esperava aquest:

0x1e 0x97 0x05

I s’ha trobat amb aquest:

0x1e 0x97 0x06

Això és perquè els micros 1284 i 1284P tenen el mateix nucli però canvia el consum d’energia i el identificador. Aquí ho explica bé:

https://sepzed.wordpress.com/2014/03/15/arduino-on-1284p-and-1284-non-p-version/

Per un moment enganyarem al entorn dient que el nostre micro té el identificador 0x1e 0x97 0x06. Això es configura a aquest arxiu:

C:\Program Files (x86)\Arduino\hardware\tools\avr\etc\avrdude.conf

En: # ATmega1284P, signature = 0x1e 0x97 0x05; (canviar per 0x1e 0x97 0x06).

Un cop haguem modificat aquest arxiu ja ens deixa programar el bootloader. Per poder tornar a baixar sketchs al micro haurem de deixar l’arxiu avrdude.conf tal i com estava


3 – Carregar el programa al micro ATmega1284:

Es fa de la mateixa manera que es fa amb qualsevol placa d’arduino. Seleccionar la placa dins de Tools > Board.


Mes informació sobre el tema:

https://maniacbug.wordpress.com/2011/11/27/arduino-on-atmega1284p-4/
http://www.gammon.com.au/forum/?id=11635
https://github.com/JChristensen/mighty-1284p/tree/v1.6.3

© 2024 Albert Palomas

Theme by Anders NorenUp ↑